Crying Cloud

AKS Edge Essentials - deploying the latest version

Just my luck, straight after creating my last blog post on deploying and using AKS Edge Essentials, a new version of the tool was released which renders some of the previous instructions and config invalid. This is due to some of the steps being streamlined and an updated JSON schema. (Thanks to @LiorKamrat for highlighting this to me)

For information, the previous articles were using the following module versions:

AKS Edge version 0.7.22335.1024
AKS Edge shell version 1.0.221212.1200
AKS Edge deploy version 1.0.230123.1500

The latest modules are the following versions:

AKS Edge version 1.0.266.0
AKS Edge shell version 1.0.230203.1200
AKS Edge deploy version 1.0.230203.1200

Here’s what I did to deploy the new version.

Uninstall AKS Edge Essentials

If you have previous versions of AKS Edge deployed, go ahead and remove the cluster and then remove the tool as per the official documentation instructions: https://learn.microsoft.com/en-gb/azure/aks/hybrid/aks-edge-howto-uninstall


Install the latest version of AKS Edge Essentials

Preparing your system follows the same pattern as per my previous instructions (here), but with the new version of the tool, you can simplify the process by using the Install-AksEdgeHostFeatures command from the AKSEdgePrompt PowerShell Window, once the latest version of the AKS Edge tool has been installed.

Get the latest version of AKS Edge for K8s here: https://aka.ms/aks-edge/k8s-msi

(The MSI file will be named AksEdge-K8s-1.0.266.0.msi)

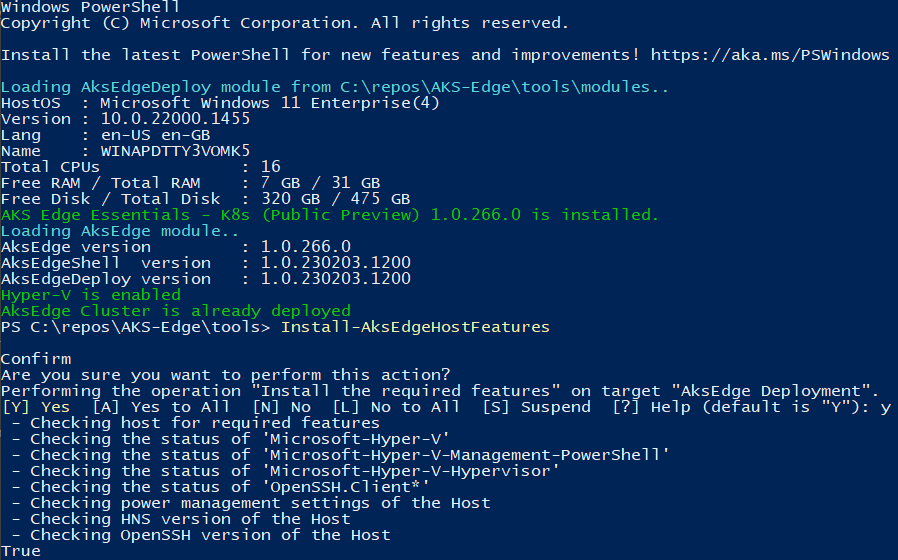
Above, we can see that I have already got all the pre-reqs configured correctly

At this point, I would also get the latest version of Helm (instructions taken from here)

#download helm from web
Invoke-WebRequest -Uri "https://get.helm.sh/helm-v3.6.3-windows-amd64.zip" -OutFile ".\helm-v3.6.3-windows-amd64.zip"
#Unzip to a local directory
Expand-Archive "helm-v3.6.3-windows-amd64.zip" C:\helm
#set helm in the env Path
$env:Path = "C:\helm\windows-amd64;$env:Path"
[Environment]::SetEnvironmentVariable('Path', $env:Path, 'Machine')

I ran the commands above from the AksEdgePrompt PowerShell session. I’ve added the path to the system environment variable (Machine) as I found that the path for Helm was not persistent across sessions when this was not specified.

Check the helm version

Helm version 3.6.3

create config file for scalable cluster

With the new version of the AKS Edge tool, the as previously mentioned, the JSON schema has been updated, so any previous config cannot be used. Here is the config I used to deploy a ‘scalable cluster’ (in my case, it is still a single machine cluster, but I can access the services running on it over my home network).

Whereas before, there were two config files, this has been collapsed into one.

The Arc section is used to register the cluster with Azure Arc and doesn’t need to be populated for the initial cluster deployment.

If you do want to populate the Arc section, you can obtain details such as SubscriptionID and TenantId using the following commands:

az login
#optional - run if you have multiple subscriptions and want to select which one to use
az account set --subscription '<name of the subscription>'

#SubscriptionId
az account show --query id -o tsv

#TenantId
az account show --query tenantId -o tsv

If you haven’t created an Azure AD Client App for use by Azure Arc for this cluster, then the official docs tell you to create one using the process here. That works, but you can use the updated AKS Edge tools to help create a more locked down assignment.

From the AKS-Edge repo, edit .\tools\scripts\AKSEdgeAzureSetup\AzureConfig.json

Fill in the details highlighted in the picture below.

From the AKS Edge prompt PowerShell window, change the directory to .\scripts\AKSEdgeAzureSetup and run:

.\AksEdgeAzureSetup.ps1 -jsonFile .\AzureConfig.json -spContributorRole

This will:

  1. Check if Azure CLI is installed (and install if not)

  2. Check if the resource group exists - if not will create

  3. Checks if Microsoft.HybridCompute provider registered - if not, will register

  4. Checks if Microsoft.GuestConfiguration provider registered - if not, will register

  5. Checks if Microsoft.HybridConnectivity provider registered - if not, will register

  6. Checks if Microsoft.Kubernetes provider registered - if not, will register

  7. Checks if Microsoft.KubernetesConfiguration provider registered - if not, will register

  8. Checks if Microsoft.ExtendedLocation provider registered - if not, will register

  9. Check if a Service Principal exists, if not, will create it (assuming you have permissions)

  10. Populate the AzureConfig.json file with the Arc configuration items.

You can now copy the Arc config items into the aksedge-config.json file. If the ”AksEdgeConfigFile”: “../../aksedge-config.json“ parameter is set, the script will populate the Arc parameters for you.

Using a similar procedure to create the aksedge-config.json per my previous post, use the following JSON document as a template:

{
    "SchemaVersion": "1.5",
    "Version": "1.0",
    "DeploymentType": "ScalableCluster",
    "Init": {
        "ServiceIPRangeSize": 10,
        "ServiceIPRangeStart": "<Free IpV4 address>"
    },
     "Arc": {
        "ClusterName": null,
        "Location": "uksouth",
        "ResourceGroupName": "rg-aks-edge-demo-uks",
        "SubscriptionId": "<Your Azure SubscriptionId>",
        "TenantId": "<Your Azure AD Tenant Id>",
        "ClientId": "<Azure AD App Client Id>",
        "ClientSecret": "<Azure AD App Client Secret>"
    },
    "Network": {
        "NetworkPlugin": "calico",
        "ControlPlaneEndpointIp": "<Free IpV4 address>",
        "Ip4GatewayAddress": "<IPv4 Gateway address>",
        "Ip4PrefixLength": 24,
        "DnsServers": [
            "<Your DNS Server e.g.:>8.8.8.8",
            "1.1.1.1"
        ]
        ,
        "InternetDisabled": false,
        "Proxy": {
            "Http": null,
            "Https": null,
            "No": null
        }
    },
    "User": {
        "AcceptEula": true,
        "AcceptOptionalTelemetry": false
    },
    "Machines": [
        {
            "NetworkConnection": {
                "AdapterName": "<Your Adapter Name for External Switch>",
                "Mtu": 0
              },
            "LinuxNode": {
                "CpuCount": 4,
                "MemoryInMB": 4096,
                "DataSizeInGB": 20,
                "Ip4Address": "<Free IP Address for the Linux host>"
            }
        }
    ]
}

With regards to the NetworkConnection section, you only have to provide the name of the network adapter that you have already created a vSwitch for, or that you want to automatically create. The default name of the vSwitch that is created is aksedgesw-ext


create config file for Single Machine cluster

Here’s the config file I used for the single machine cluster.

You can use the details here to get the Arc config settings

{
  "SchemaVersion": "1.5",
  "Version": "1.0",
  "DeploymentType": "SingleMachineCluster",
  "Init": {
    "ServiceIPRangeSize": 10
  },
  "Arc": {
    "ClusterName": null,
    "Location": null,
    "ResourceGroupName": null,
    "SubscriptionId": null,
    "TenantId": null,
    "ClientId": null,
    "ClientSecret": null
  },
  "Network": {
    "NetworkPlugin": "calico"
  },
  "User": {
    "AcceptEula": true,
    "AcceptOptionalTelemetry": false
  },
  "Machines": [
    {
      "LinuxNode": {
        "CpuCount": 4,
        "MemoryInMB": 4096,
        "DataSizeInGB": 10,
        "TimeoutSeconds": 300
      }
    }
  ]
}

Deploying the cluster

There’s no change from the previous version, so follow the instructions here.

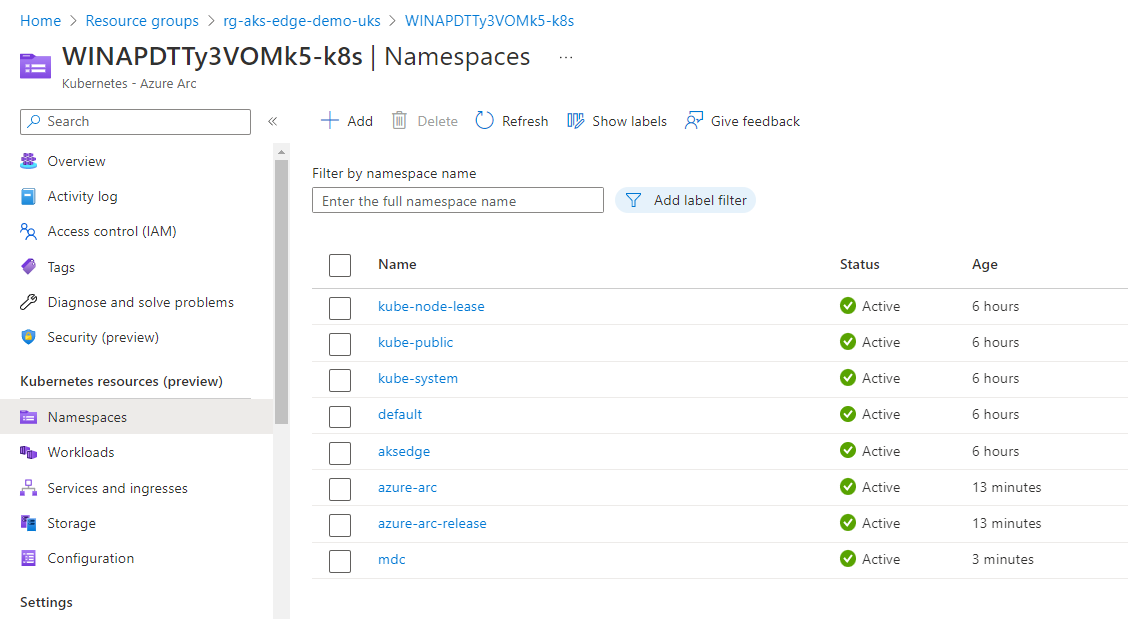
Connectingthe cluster to Azure Arc

This process is simplified than previously documented in the previous blog post when I first looked at AKS-EE.

From the AKS Edge prompt PowerShell window, run the following:

# Connect Arc-enabled kubernetes
Connect-AksEdgeArc -JsonConfigFilePath .\aksedge-config.json

I have now done this a few of time, and I’ve found that the command can halt at the following step ( I left for longer than 10 minutes…):

If it does, I found closing the window, opening a fresh AKS Edge prompt PowerShell window and running the command again works.

And that’s it. I guess that with the AKS Edge tool now being v1, it’s pretty much GA release ready.

AKS Edge Essentials - diving deeper

I‘ve had the chance to use AKS Edge Essentials (AKS-EE) some more and I got to figure some more things out since my earlier article.

Whilst I ‘successfully’ deployed the cluster, it turn out that the configuration I had used meant that whilst I could deploy apps to the cluster, they couldn’t be accessed - therefore pretty pointless.

Looking further into this, the reason was I was using the aksedge-config.json file provided with the AKS Edge repo. That config file is geared towards multi-machine clusters, not single machines.

I managed to figure out two ways to fix the issue.

  1. Create a cutdown version of the config file with minimum parameter set

  2. Modify the existing config file to work as it should.

I had to uninstall and redeploy the cluster for both methods.

This a straightforward task, based on the official docs.

From the AKS Edge prompt PowerShell window:

# Disconnect cluster from Azure Arc
Disconnect-AideArcKubernetes

# Remove the cluster
Remove-AksEdgeDeployment -Force

There’s no need to uninstall the AKS Edge runtime.

Method 1

The most straightforward method is to create a config file with the minimum parameter set.

This will create a single machine cluster, using an internal vSwitch network, only accessible from the system you deploy it on..

  1. Save the content below into a file in the tools directory. I called it aksedge-singlemachine.json

{
  "SchemaVersion": "1.1",
  "Version": "1.0",
  "DeployOptions": {
      "ControlPlane": false,
      "Headless": false,
      "JoinCluster": false,
      "NetworkPlugin": "calico",
      "SingleMachineCluster": true,
      "TimeoutSeconds": 900,
      "NodeType": "Linux",
      "ServerTLSBootstrap": true
  },
  "EndUser": {
      "AcceptEula": false,
      "AcceptOptionalTelemetry": false
  },
  "LinuxVm": {
      "CpuCount": 4,
      "MemoryInMB": 4096,
      "DataSizeinGB": 30
  },
  "Network": {
      "ServiceIPRangeSize": 10
  }
}

2. Install the cluster per the instructions here (changing the -jsonconfigfilepath parameter)

New-AksEdgeDeployment -JsonConfigFilePath .\aksedge-singlemachine.json

Method 2

With this method, we aren’t deploying using the single machine config parameter. It will still be a single machine ‘cluster’, but will use an external vSwitch, so any app that is deployed can be access on the network, published from your machine.

First, we need to get some details of the network interface that will be used to create the external vSwitch. From the official documentation:

Run the following command to find the network adapters that are connected:

Get-NetAdapter -Physical | Where-Object { $_.Status -eq 'Up' }

Make a note of the name of either the Ethernet or WiFi adapter.

Next up, edit the aksedge-config.json file.

Edit ”SingleMachineCluster”: false, and populate the vSwitch parameters

Make sure the IP addresses, gateways and DNS servers match your network.

{
    "SchemaVersion": "1.1",
    "Version": "1.0",
    "DeployOptions": {
        "ControlPlane": false,
        "Headless": false,
        "JoinCluster": false,
        "NetworkPlugin": "calico",
        "SingleMachineCluster": false,
        "TimeoutSeconds": 900,
        "NodeType": "Linux",
        "ServerTLSBootstrap": true
    },
    "EndUser": {
        "AcceptEula": false,
        "AcceptOptionalTelemetry": false
    },
    "LinuxVm": {
        "CpuCount": 4,
        "MemoryInMB": 4096,
        "DataSizeinGB": 30,
        "Ip4Address": "<free ip on your network>"
    },
    "Network": {
        "VSwitch": {
            "Name": "aksee-ext",
            "Type": "External",
            "AdapterName": "<Ethernet Adapter Name>"
        },
        "ControlPlaneEndpointIp": "<free ip on your network>",
        "Ip4GatewayAddress": "<Gateway address>",
        "Ip4PrefixLength": 24,
        "ServiceIPRangeSize": 10,
        "ServiceIPRangeStart": "<start free ip on your network>",
        "ServiceIPRangeEnd": "<end free ip on your network>",
        "DnsServers": [
            "<DNS Server on your network>"
        ],
        "InternetDisabled": false,
        "Proxy": {
            "Http": "",
            "Https": "",
            "No": ""
        }
    }
}

With those changes in place, go ahead and deploy the cluster per the instructions here.

Once the cluster is deployed, continue to follow the instructions to connect the cluster to Azure Arc.

Deploying a test app

Now that I have a working cluster, I tested deploying the ‘Hello Arc’ app via GitOps.

Following the instructions for Remote deployment and CI with GitOps and Flux:

Fork the Azure Arc Apps repo:

(If you don’t want to fork your own repo, you can use mine: https://github.com/dmc-tech/azure-arc-jumpstart-apps)

From the Azure portal, locate the resource group that the Azure Arc enabled Kubernetes cluster resource is located and open the GitOps blade.

First, create the nginx configuration.

You can follow the steps below:

Here you can see the configuration objects progress…

Once the config-nginx config has successfully deployed (it can take a few minutes), you can deploy the actual app.

The progress of the configuration objects and the pod creation can be seen below via the Azure portal. Hopefully you can see the potential of the single pane of glass to manage multiple clusters from diverse locations.

Once the app has been deployed, it can be tested. I found the external IP address of the nginx instance by looking at the Services and ingresses of the cluster.

And there we have it.

I’m glad things didn’t work perfectly the first time as it allowed me to try some different things and understand what’s happening with the tool some more.

I would feel confident rolling this out to production scenarios since I’ve tried these different options.

Installing AKS Edge Essentials public preview

UPDATE: Check out this later post for lessons learnt and some configuration information that you will want to use https://www.cryingcloud.com/blog/2023/2/3/aks-edge-essentials-diving-deeper


Microsoft announced the Public preview of AKS Edge Essentials (I’m going to abbreviate to AKE-EE!) a few months ago and I wanted to try it out.  I think it's a great idea to be able to run and manage containerized workloads hosted on smaller, but capable compute systems such as Intel NUC's, a Windows desktop/laptop etc. By using Azure Arc to manage this ecosystem is quite a compelling prospect.

 https://learn.microsoft.com/en-gb/azure/aks/hybrid/aks-edge-overview

 To try it out, I looked through the public preview documentation, using my Windows 11 laptop to run AKS-EE. The doc's are pretty good, but make some assumptions, or miss some steps, especially if you're coming to this cold. I decided to use K8s, rather than K3s, so this blog is geared towards that.

There is a recently published Azure Arc jumpstart scenario which creates a VM in Azure and does the same (but automated!).

Prep your machine

https://learn.microsoft.com/en-gb/azure/aks/hybrid/aks-edge-howto-setup-machine


First of all, you need a system running Windows 10/11 or Windows Server 2019/2022 I chose my laptop as it is capable, but you could use an Azure VM running Windows server 2019/2022.

I'm using VS Code, so I'd recommend installing that if you haven't already done so. You will also need your own GitHub account, as you will need to clone the AKS Edge project into your own repo.v

If Hyper-V isn't already enabled, you can either do this manually, or let the AKS Edge setup script do this for you. Check it's enabled (from an elevated PowerShell prompt):

Get-WindowsOptionalFeature -Online -FeatureName *hyper*

If you need to install it (from an elevated PowerShell prompt):

Enable-WindowsOptionalFeature -Online -FeatureName Microsoft-Hyper-V -All

The docs say to disable power standby settings. If you’re deploying AKS-EE in a remote location, you’ll want to keep the system running 24/7, so this makes sense. For a kick the tires scenario, you probably don’t need to do this.

To check the current power settings of your system, run:

powercfg /a

You can see above, that I’ve already disabled the power standby settings. If any of them are enabled, run the following commands:

powercfg /x -standby-timeout-ac 0 
powercfg /x -standby-timeout-dc 0 
powercfg /hibernate off

reg add HKLM\System\CurrentControlSet\Control\Power /v PlatformAoAcOverride /t REG_DWORD /d 0

If power standby settings were enabled, reboot your system and check they’ve been disabled.

Installing AKS-Edge Essentials tools

Once the machine prep is complete, go ahead and download the AKS-Edge K8s tool from https://aka.ms/aks-edge/k8s-msi

It’s an MSI file, so go ahead and install on your system however you prefer (next, next, next… ;) ).

Once that’s done, we need to clone the AKS-EE repo to the local system. I’ve done this via VS Code.

  1. Open the Source Control blade

  2. Click on Clone Repository

  3. Paste the url https://github.com/Azure/AKS-Edge.git

  4. Click on the Clone from URL option

Select a folder from window that pops up of where you want to store the repo on your local system.

In my example, I cloned to a directory called C:\repos

A message will pop up in VS Code stating that the repo is cloning.

Click Open to display folder in VS Code

Open a  PowerShell terminal within VS Code, and navigate to the tools directory from the repo you’ve just cloned.

from the PowerShell terminal window, run the following command:

.\AKSEdgePrompt.cmd

It will open a  new PowerShell window as Admin, check Hyper-V is enabled and AKS Edge Essentials for K8s is installed. Remember to run further commands in this newly instantiated PowerShell window.

Within this window, you can check that the AKSEdge module has been imported.

Get-Command -Module AKSEdge | Format-Table Name, Version

Deploying the cluster

I use the term cluster loosely, as I’m running this from my laptop, but you get my meaning.

Given this, I need to edit the config to reflect a single machine scenario.

From VS Code:

  1. Open the aksedge-config.json file in the tools directory.

  2. As I'm using K8s, edit the NetworkPlugin parameter to use calico "NetworkPlugin": "calico",

  3. You need to select a spare IP on your local network for the VM that’s provisioned. My home router uses 192.168.1.0/24, so I selected a free address not in the DHCP lease range.

  4. Select another free IP on your network for the API end point

  5. …and now enter the start and end range for the kubernetes services

If you’re interested, you can check out the config options here and further descriptionm on what each setting does here: https://learn.microsoft.com/en-us/azure/aks/hybrid/aks-edge-deployment-config-json

Once you’ve saved the config file, go ahead to the PowerShell window that you opened via the AKSEdgePrompt.cmd and run the following to start the deployment (assuming you are still in the tools directory in the repo):

New-AksEdgeDeployment -JsonConfigFilePath .\aksedge-config.json

If everything is in place, that should start the deployment

When prompted, choose whether you want to send optional or only required diagnostics data.

.. eventually it will complete…

Let’s prove we can use kubectl to talk to the API and get some info

kubectl get nodes -o wide

kubectl get pods -A -o wide

Cool, the base cluster is deployed :)

Something to be aware of:

In the repo’s tools directory, a file will be created called servicetoken.txt.

Take care of this file as it is a highly-privileged token used to admin the K8s cluster. Make sure not to commit the file into your repo. You will need this token for certain activities later on.

Connecting AKS Edge Essentials to Azure Arc

The provided repo has some nice tools to help you get connected to Azure Arc, but we need to get some configuration information prior to running the scripts. To make it easy, here are some of the az cli commands to get what you need.

az login
#optional - run if you have multiple subscriptions and want to select which one to use
az account set --subscription '<name of the subscription>'

#SubscriptionId
az account show --query id -o tsv

#TenantId
az account show --query tenantId -o tsv

edit the aide-userconfig.json file from the tools directory

Change the following parameters using the values captured

"SubscriptionName": "<Azure Subscription Name>"
"SubscriptionId": "<SubscriptionId>",
"TenantId": "<TenantId>",

There’s no indication inn the docs whether to change the AKSEdgeProduct from K3s to K8s. I did - ‘just in case’

"AksEdgeProduct": "AKS Edge Essentials - K8s (Public Preview)"

Go ahead and name your resource group, service principal and region to deploy to. If the resource group and service principal do not exist, the deployment routine will create them for you. In the case of the service principal, it will assign contributor rights to the resource group scope.

Once the config file is saved, we’re ready to setup Arc.

From the PowerShell window, I decided to move to the root of the repo (not tools as previous), and ran the following command to setup the resource group, service principal permissions and role assignment:

.\tools\scripts\AksEdgeAzureSetup\AksEdgeAzureSetup.ps1 .\tools\aide-userconfig.json -spContributorRole

A warning is shown that the output includes credentials that you must protect. If you open the aide-userconfig.json you’ll notice it is populated with a service principal id and corresponding password created when the script was run.

If you want to test the credentials, run the following:

.\tools\scripts\AksEdgeAzureSetup\AksEdgeAzureSetup-Test.ps1 .\tools\aide-userconfig.json

To test the user config prior to initialization:

Read-AideUserConfig

Get-AideUserConfig

Time to initialize…

Initialize-AideArc

…and now to connect…

Connect-AideArc

Once complete, we can check the Azure portal to see that that the Arc resources are present in the resource group I specified in the config file. There will be one entry for ‘Server’ (my laptop) and another for Kubernetes

Select the Kubernetes - Azure Arc resource and then select ‘Namespaces’.

We need to paste the service token that is created when Connect-AideArc is run. This is located in .\tools\servicetoken.txt

Paste it in the Service account bearer token field.

You’ll now be able to query resources in your cluster.

All in all, the tools and scripts developed for AKS Edge Essentials work really well and I didn’t come across any issues. It bodes well for when it moves to GA.

Next steps for me are to investigate further scenarios and see what I can do on the platform.